COVID19 – Quarantine Buns

My husband and I entered self-quarantine one week ago today, because we had left an area in Florida where there were growing numbers of community acquired cases of Corona virus. Our home is comfortable and we have food in the freezer so nobody is in a panic at our house.

Temperatures were in the unseasonable high eighties yesterday and the weather demanded summer-like food. My frozen burger patties were slated to be grilled when I realized I didn’t have any buns. Under normal circumstances this would have been resolved by a quick trip to the local grocery store, but we are in quarantine. Fortunately I have ingredients and decided to try my hand at making hamburger buns.

I googled several recipes for these buns, finally deciding on one where I could use my bread maker to do the kneading. I loaded the wet ingredients into the hopper, followed by the dry, topping it off with my yeast, turned the machine to a dough setting and left for a three mile bike ride. When I returned, I gently lifted the dough, rolled it into 1/2 inch thickness and cut uniform circles with a drinking glass.

These little rounds rested on a sprayed cookie sheet for an hour where they doubled in size before being baked for @15 minutes in a preheated oven. Once cooled, I broke them apart, sliced them in half, and enjoyed our burgers.

The buns have a slightly denser texture than the flimsy, low cost buns I usually buy. They taste more like fancy, artisan buns. I guess they are!

As we are all locked down, this is a great time to experiment and try new things. You may just discover something you love!

Advertisement

Watching COVID19 – Fleeing Florida

My husband and I spent the winter in Florida this year. We packed up our little 16 ft travel trailer and headed south shortly after Christmas. Virginia winters are chilly, sometimes there is even snow. We chose to escape winter for many reasons, one being the lure of summer-like temperatures.

First stop was a six week stay at a private campground in Florida City, the gateway to the Keys. Our Florida State Park pass gave us access to all of the State Parks in the Keys and we visited many of them, bicycling around the parks as well as the local communities. We soaked up sun, swam in the waters, and hung out enjoying the beautiful scenery and weather. At the private campground, we participated in many activities, made friends, and were very sad to leave when our time was done.

From there, we headed north for a two week stay at Jonathon Dickinson State Park by the Atlantic Ocean. Florida’s state parks are in high demand, despite their limit of two week stays. We were fortunate to get in at all, as reservations must be made 11 months ahead. We logged miles on our bicycles on the park’s many trails and enjoyed campfires and nature. Our time ended and we moved to a private resort in Ft. Myers for the final month of our trip.

By then, we were starting to see news stories about a killer virus in China. Then reports started targeting cases in Florida, all travel and cruise related. Florida takes the COVID19 virus very seriously and nightly news reports stated how many cases were identified, where they were contracted, where the people were recovering (hospital, nursing facility, or their homes) and how many cases were being monitored for development. We kept a social distance from folks we met and didn’t participate in any group activities. Florida’s first COVID19 death occurred in a local hospital.

Our daughter back in Virginia was very concerned, especially as the news reported more and more cases of COVID19 across many states. She wanted us home!

We, however, were enjoying the 85 degree sunshine and were reluctant to trade that for 50 degree drizzle in Virginia. Besides, our campsite was paid until the first of April, with no refunds. We figured we weren’t in any danger to just stay in place.

There were only a few cases of travel-related COVID19 in our area when my husband surprised me by asking me to write out a 4 week menu for the two of us using only shelf stable foods. I don’t usually cook with shelf stable food, and figured we could eventually use it for our hurricane supplies. I didn’t think we had any reason for concern. We then purchased this food and stored it in a big plastic bin in our van. His reasoning was that we might be quarantined in the campground for a month and this way we would be prepared. I keep a pantry at home, but certainly didn’t pack food for a 12 week trip in our little trailer. We tend to visit the grocery store every couple of days, picking up milk, bread, meat, and whatever else that is running low. The shelves were full, the store relatively empty, and we gathered our lengthy list with no problems.


One week ago today we were the lone mini golf players at the resort’s golf course, arguing with our daughter by phone, trying to convince her that we were fine as she was trying to convince us that we were not. We had plans to meet friends at a restaurant the following day, but that evening Florida announced its first community acquired case of COVID19 in our area.

We prayed for direction and peace. Odds are, this wasn’t a huge threat to us, and prepared to make the 45 minute drive to see our friends. As I was getting ready, not thinking about anything except applying make up and fixing my hair, the voice of God spoke to my spirit. Clearly, I heard, “It’s time. It’s time to go home.” and a peace flooded over me. I told my husband it was time to go home and he agreed that we would leave in the morning.

We headed out to meet our friends, and on the way I developed a raging sore throat. It was almost instantaneous. With only three miles to go, we cancelled, turned around, and headed back. My husband made one stop at a drug store to buy a numbing throat spray for me, and we quickly packed up our campsite and started the drive back at 2:30 pm.

On the road we learned that three more community acquired cases had been identified in our area. This is no longer a virus limited to those who caught it while traveling over seas; it is now real, it is a pandemic, and it is in our backyard!

Because we were coming from an active community acquired area, we began practicing self quarantine while on the trip home. Usually we stop and eat at restaurants, use the public facilities and take stretch breaks. This trip was different. We used the facilities in our trailer for bathroom and meals, avoiding people as much as possible. My husband used disposable gloves for pumping gas and copious amounts of hand cleaner.

We are home now, our trailer is unpacked and returned to storage, and we have settled in for a two week isolation. Every day on the news, we see stricter regulations from our government and watch more and more businesses close. Our daughter is working from home and her computer equipment is spread over our dining room table. My husband is working on the kitchen table, filing our taxes and watching the stock market tank. I am spending lots of time in my home office, reading the Bible, writing and praying.

Every day we see more and more reports of deaths from this virus, accelerating numbers of cases and growing restrictions. We were fortunate to arrive home before domestic travel bans are implemented for civilians and military families. We hear the ever expanding time lines of projections when this siege will end.

We join the rest of the world watching COVID19.

Taking it all For Granted

The morning after the rare snowstorm, bringing 22 degree temperatures and no power!

We are experiencing a rare polar temperature plunge. In fact, it is colder here in VA BCH than in Northern Michigan right now. Last night’s snowstorm (another rarity) dropped about 4 “of icy snow and we woke up to clear blue skies, sunshine, and NO POWER.
We were better prepared for power outages when we lived on a country road in Michigan. Frequent blizzards and ice storms necessitated the use of our trusty generator and wood stove almost every winter. We simply cooked in the downstairs kitchen on the gas stove instead of using the electric stove in our regular kitchen or cooked something in a pot on the wood-burner as we heated the house. The generator ran the pump and kept the refrigerator cold, and was equipped with a convenient switch that routed the power to house when the power went down. And, if the well failed, our backyard pond could supply ample water till things straightened out again.
But, a few years ago, we traded the country life for a neighborhood in a major city. Shopping is better; there are at least 6 different grocery stores within a 3 mile circle from our home, and multiple malls and big box stores within 10 miles. We have numerous hospitals close by, and are not limited to medical care. Entertainment opportunities abound in the big city. And, instead of our closest neighbors being a half mile down the dirt road, we have community.
This morning, however, I missed the country life. While we have a gas furnace, the ignition and fan are electric. We have a gas stove, but had to find matches to light the burners. And, as we watched the interior temperatures drop, we reminisced over the ease of flipping a generator switch in the country house as we debated about which appliances were the most important to access the generator first. Thankfully water is not a problem, because the city feeds provide pressure for flushing toilets, but how to keep the pipes from freezing?
We dug out our long underwear, dressed in layers and boiled a kettle of water to make to coffee. I was amused to find myself automatically reaching for light switches in rooms, only to remember, “Oh, no power.” We take having electricity at our fingertips for granted.
This is the first power outage we have experienced here; the lines are buried so even during the past three hurricanes, our lights have not flickered. Nearly 4,000 customers were without power this morning and I am grateful for the crews who worked in the 22 degree cold to quickly restore our electricity.
This minor blip, this short term power outage, makes me think of all the other things we casually take for granted in our lives. Having available food, a home, clothing, friends, instant technology, freedom to worship, living in relative safety, and health are all treasures. And most of all, a loving creator God who wants to have a personal relationship with us.
In a recent Sunday school class, we talked with the elementary children about living without electricity. They were horrified by the thought of not having their tablets and cell phones. One ten year old said he could live without electricity as long as he could still play his video games any time he wanted. An eleven year old girl said she couldn’t live without her cell phone. We teachers struggled to help them understand that there are places on earth where people live without such modern conveniences, but I’m sure they thought we were exaggerating. Not only do we, as a population, take our luxuries for granted, but we claim them as a necessity.
Yet the only REAL necessity we have in this life is a personal relationship with our loving creator God. He supplies all of our needs, from the air in our lungs, to the food we eat and the clothing we wear. Everything we are and have come from His hand.
In Exodus 33, the Bible records a conversation between God and Moses. The people have rebelled and God is angry. He tells Moses that He will send an angel to bring them to the Promised Land but He will not go with them because of their sin. The people repent and God relents. Moses declares, “If your Presence does not go with us, do not send us up from here.”
We need to cultivate the heart of Moses. It isn’t our creature comforts that matter the most, but our relationship with God. We need God’s presence in our lives far more than electricity and other modern conveniences. And, like electricity, He is always near, but we just take Him for granted.

Myself—On the Shelf

Sometimes circumstances force us to the sidelines.  We don’t understand why.  We hate being out of commission.  But, sometimes, the only response is compliance, as difficult as that may be.

Are there any other shelf-sitters out there?

The saga of my foot injury continues.  It was rapidly improving  after the “Snap, Crackle, Pop” incident.  No longer swollen or bruised, and no longer constantly aching.  Sure, it would get tired after a long walk and ice baths felt amazing, but there was lots of improvement over the mess it had been in July.  A nurse friend suggested I get an x-ray, just be sure, but I was pretty sure that would be money needlessly spent.

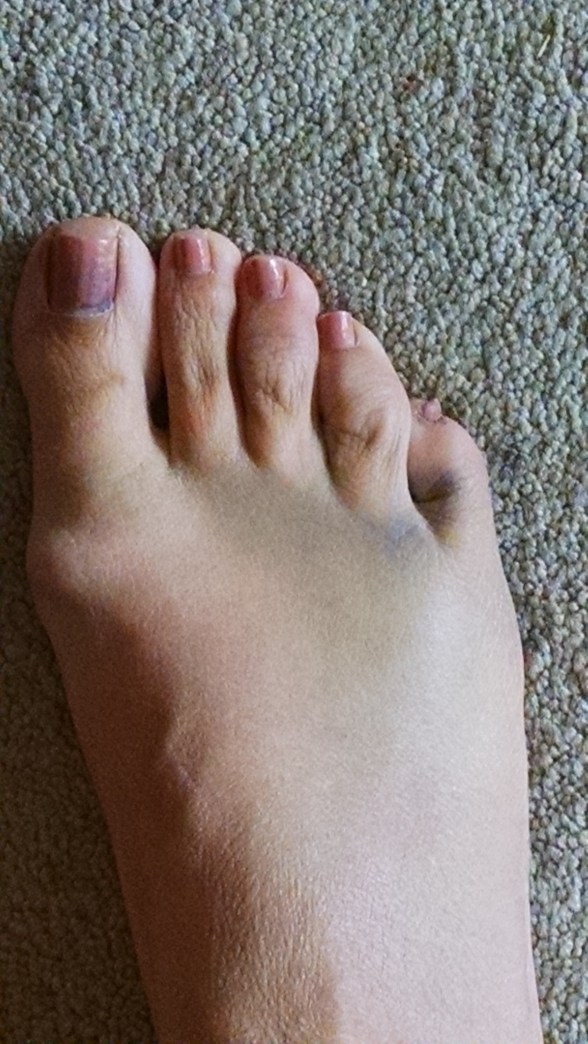
And then, it happened; a collision with 60 pounds of furry force bent my toes backwards and bathed me in white hot pain.  Barefoot, in the recliner, my foot collided with boundless puppy energy.  This time, the constant throbbing didn’t go away after a couple of weeks.  Because there was no additional bruising and no noticeable swelling, I self-diagnosed that I probably had something out of joint from the latest collision and called my chiropractor.

After hearing my litany of injuries to my foot, she wisely refused to see me without a foot x-ray and sent me to an urgent care center.  Still loudly insisting it was only a sprain, I submitted to an x-ray.

20992884_10212770999046247_36019243525522514_n brokenfoot

You don’t have to be a radiologist to see what is wrong with this picture.  I broke the knobby end of the toe bone at the joint.  The Urgent Care Dr. suggested I call a Podiatrist.

The Podiatrist looked at the x-ray and listened to the long, complicated history of the foot injury and thanked me for bringing him such an unusual and interesting case.  This is not a normal injury.  He sold me a “Magic Boot” to stabilize my foot, told me to come back in a week after he had consulted with other specialists, and told me to “cut back on my normal activity.”

I am very active.  I hit the ground running in the morning and usually do not sit down till around 8 pm for a couple hours of television before heading to bed.  But, in obedience to the Dr.’s orders I  swapped out my running shoe for the magic boot, stopped mowing the lawn with the push mower and taking the dog on 3/4 mile walks.

He was not happy with me when I returned.  I was still feeling my pulse in my foot when I went back to his office and he asked me why I hadn’t cut back on my activity.  I said I had, but apparently not enough.  Clarifying, he told me “I want you to stay OFF YOUR FOOT.  Sit when you could stand, crutches or knee scooter when you could walk, and no stairs for the next TWO MONTHS.”  This means no shopping, no driving, no walking.

If I rest my foot completely, there is a chance that I can avoid surgery.  The body may form a fibrous scar around the broken chip, which will look funky in future x-rays, but should be functional.  If I don’t rest it enough to form the scar, I will need a complicated surgery to not only remove the chip but to attach ligaments back to the parent bone with screws and pins, bringing an even longer and more difficult recovery period.

Did I mention that my bedroom and my office are on the second floor?

I am reminded of the joke about the old lady who broke her leg and couldn’t climb stairs for 3 months.  When her doctor finally removed her cast and granted her permission to climb stairs again, she said, “Hallelujah!  It has been so hard to shinny up that drainpipe every night to go to bed.”

I’m not shinnying up drainpipes, but I go up and down the stairs on my bum, lifting myself with my arms, chair dip style.  I have crutches for the upstairs of my house, and a borrowed knee scooter for the downstairs.

What can you do with no hands and only one leg? It is surprisingly tiring to get around with these aides. and very limiting.  Cooking, for example, requires many trips around the kitchen just to gather ingredients and utensils, and because I cannot get as close to the stove as I need to, there is lots of leaning.  I haven’t figured out how to maneuver loading  the dishwasher or oven because of the weird angles from the scooter, and the fact that I need one hand to steer it.

Fortunately my daughter and husband have graciously jumped in to assume my share of the house-hold tasks.  I am grateful to family and  friends who have given me rides to and from events, and have brought me meals and drinks. I think these devices should come with drink holders, or I should buy one of those hiking bladder backpacks.

So I am spending time “on the shelf.”  This is a rare opportunity for study, reading, painting, and prayer.  Prior shelf times have always been followed by headlong plunges into busy seasons of ministry and I don’t suspect this is any different.  It is a time of healing, for my foot, and a time of preparation for the what ever is waiting around the bend.


###


Left-Armed Louie is Back!

I hurt my right arm this summer; probably a combination of age and over-use from a heavy week of chopping and cranking three bushels of apples into sauce.

Despite trying to “work through the pain,” I finally went to the doctor when my arm started throbbing like a toothache from knuckles to shoulder. The diagnosis of Tendonitis and directions for total rest and aggressive icing has kept me off the computer. No typing allowed! Through this unpleasant season I have learned how to do many things left-handed, but have new appreciation for the term “right-hand man.”

The sling is gone, but I still wear a brace to support the tendon. And, while it still hurts, it isn’t waking me up at night anymore. Not being able to do things is driving me up the wall.

Because of the physical limitations from being “one-handed,” my normal cooking activity has been greatly curtailed. However, I discovered a recipe for No Knead Bread that is amazing! You don’t need two totally functioning hands to make this!

The recipe is simple! Three cups of regular white flour, one teaspoon of salt, 2 1/4 teaspoon of rapid rise yeast, and 1 1/2 cups of warm water. Mix it up in a bowl, cover with plastic and put in a warm place for a couple of hours to rise.

The flour, water, and yeast mix ready to turn into sponge.

The flour, water, and yeast mix ready to turn into sponge.

I covered the bowl of dough with a piece of plastic wrap, placed it inside my Dutch Oven, and set it in a sunny spot in my kitchen.

The sunshine streaming through the window made free heat for my dough.

The sunshine streaming through the window made free heat for my dough.

After two hours, the dough had risen to the top of the bowl and was ready for the next step. I dumped the sticky sponge onto a flour-covered cutting board, rolled it around and shaped it into a ball for the second rising. This sat on my counter for a half hour.

Dough ready to rise again.

Dough ready to rise again.

While the dough was rising I preheated the oven to 450 degrees. The Dutch Oven and lid went inside the oven to heat for a full thirty minutes. The dough was then placed inside the hot Dutch Oven and covered for thirty minutes of baking; I removed the lid and baked it uncovered for an additional fifteen minutes.

The bread slid easily from the pan onto the cooling rack. It has a crunchy crust and tastes like fancy artisan bread from five-star restaurants. The Dutch Oven acts much as an old-fashioned clay oven.

The prettiest (and easiest) bread I have ever made.

The prettiest (and easiest) bread I have ever made.

We could hardly wait to cut and sample it. It tasted great with homemade strawberry jam and I am already planning different combinations of spices and flours for future experiments.

The finished product!

The finished product!

I encourage you to give this a try. If you come up with any winning combinations of flours and spices, please post them in comments.

My Favorite “Hamburger Helper”

We had lots of company over the Labor Day weekend, which meant preparing lots of meals!  I enjoy cooking so that was not a problem, but never know how much  to prepare, with people popping in and out and never wanting to end up short on food.  I would much rather have more food than I need on hand than to run short. 

One of our planned lunches was burgers on the grill and we loaded up on fresh ground beef, conveniently on sale at the local supermarket.  I commented to my husband that my pantry supply of canned ground beef was running low and how I half wished I had time to process some at such a great price.  (Canned burger in the pantry?  You betcha!)  After the weekend I was left with about 8 pounds of extra meat which I processed on Tuesday.  It is so easy to produce this great convenience food if you own a pressure canner. 


Frying up the beef.  I love my black iron pans!

Frying up the beef. I love my black iron pans!

It isn’t a good idea to can raw ground beef because the product is too dense to heat properly, and you would end up with a sort of meatloaf-y lump. Fry it up till the pink just disappears; it will continue to cook during the canning process.

Loading the hot jars with yummy burger.

Loading the hot jars with yummy burger.

Strain the burger from the grease and spoon into hot jars to @ one inch from the top. I like to add 1/2 tsp of canning salt to each jar for taste. It isn’t necessary to add salt if you are on a sodium diet. The jars of burger will still process just fine.

Cooking up the "juice."

Cooking up the “juice.”

Drain the fat from the cooking pan,add water to the pan drippings, and bring this “juice” to a boil. Ladle this flavorful mixture into the jars of meat to @ 1 inch from the top of the jar. Release air bubbles, wipe the lip of the jars with a clean, wet paper towel to remove any grease, and seal with a new, simmered jar lid. Add hand-tightened rings to hold the lid in place and process in your canner. Process pints for 75 minutes at 10 pounds of pressure and quarts for 90 minutes. Remove from heat and allow the canner’s pressure to drop naturally before opening. This usually takes about 45 minutes.

Shelf stable burger ready for the pantry.

Shelf stable burger ready for the pantry.

Carefully remove the hot jars of meat from the canner and place on a folded towel away from drafts. In a short time you should hear the “pings” of sealing lids. Allow the jars to sit undisturbed overnight, remove the rings, wash in hot, soapy water, and label. Your jars of burger are now shelf-stable and are safe to use as long as the lid remains sealed.

To use, open and dump into a pan and heat to a boil for 15 minutes and use as a meat base for goulash, Spanish rice, chili, soups, or gravy. Canning burger allows you to take advantage of left-over meat, or cash in on grocery store sales without worrying about freezer space or power outages. It is an old-fashioned convenience food for fast and easy meal preparation!

A Saucy Treat!

God has blessed us once again, this time with an unexpected bonus of delicious apples from our backyard apple trees. We missed the ideal window of opportunity to treat the blossoms for insects this spring, but Michigan’s cold, wet spring seems to have played in our favor. The trees are loaded with fruit, and most of it is free of insects! What a surprise!

I try to limit my sugar intake in an attempt to ward off the potential of developing Type II Diabetes and have lost the taste for the heavily sugared products from the grocery store. Even the “sugar free” applesauce sold in stores tastes overly-sweet to me now.

I like to make and can my own applesauce but over the past several years our own apples have been too buggy for use and orchard apples have been very expensive. I haven’t made applesauce for a very long time and have rationed the few remaining jars in my pantry. What a wonderful surprise to discover bug-free apples on my own trees!

Although many recipes call for added sugar, you do not need to include it to make applesauce. I prefer to can it without additional spices and add them to taste when serving. I was introduced to this method years ago when living in Indiana by an elderly lady with numerous apple trees adorning her own back yard. A full, heaping bushel off apples will yield @ 22 quart jars of sauce. My little half bushel basket, filled as pictured, will yield one canner full, or 7 quart jars.

100_4354

Preparation is simple. Wash the fruit, cut into chunks and cook till soft. I trim out bruised spots and anything that looks suspiciously like a worm as well!

100_4348

Put a few inches of water in your pans with the apples and cook till the fruit is soft. Stir frequently so they don’t burn! Warning! The fragrance will be wonderful!

100_4350

The apples go into the pot with skin, core, stem, and seeds, so preparation is a breeze. My secret weapon in making great applesauce is a Victorio Strainer. They cost @ $60 but are worth every penny; it is a simple task to make applesauce using this great tool!

100_4349

This little machine assembles easily and clamps onto the counter or table. The hot, cooked apple mush is ladled into the bowl at the top, and you crank the handle on the side. The strained sauce comes down the chute and all of the other debris is deposited out of the side.

100_4351

Ladle the hot applesauce into sanitized hot canning jars, wipe the rim and top with a simmered lid. Process in a PRESSURE CANNER for 15 minutes at 5 pounds of pressure. When the pressure drops, move the jars to a folded towel to seal away from drafts; allow the jars sit undisturbed overnight.

100_4352

As the jars cool, you will hear a “ping” when they seal. The music of self reliance!

In the morning wash the jars in warm, soapy water, remove the rings, label and store in your cupboard. As long as the lids remain sealed, the product is shelf stable and will keep for years. Light exposure will cause the sauce to darken, so keep in a dark place; even store bought sauce will turn dark when exposed to light.

Home food preservation is becoming a lost art. I encourage you to make the investment in a pressure canner and begin the adventure of preserving your own harvest.

DIY Granola

100_4283

We eat a lot of whole grain at our house.  Research has shown that our bodies process whole grains much more efficiently and they provide a slower insulin hit to the pancreas. With Type II Diabetes rampant on both sides of our family, we try to maintain a healthy life style in hopes of avoiding this disease. 

Sugary foods are rampant in our food choices.  From sugar saturated French fries, to sugar being added to milk, we are inundated with sweetness.  Our bodies develop the taste for it and subsequently crave it.  No wonder this nation’s over-all health is in such distress. 

When we began the journey into eating more natural foods we discovered that we really like granola and yogurt for breakfast.  I find the flavored yogurts cloyingly sweet and store purchased granola too sweet and expensive. 

I discovered a musilex type breakfast mix on a cruise vacation and come pretty close to duplicating it for my daily breakfast.   I use plain, low-fat yogurt, flavored with about half a teaspoon of freezer jam and topped with half cup of my home-made granola.  Not all granola recipes are the same, but this particular blend mimics what I found on the cruise ship breakfast bar.  It isn’t fancy, but I think it is delicious.

Start with 6 cups of old fashioned oatmeal.  Don’t use the quick or instant variety.  Add 1 1/2 cup of walnut pieces and 1 1/2 cup of sunflower seeds.  Mix well in a large bowl.

In a separate bowl mix 1/2 cup of canola oil and 1/2 cup of honey till well blended.  Pour this blend over the oat mix and stir well to coat evenly.  Spread onto a large, greased cookie sheet with a lip and bake in a preheated 300 degree oven for a total of 30 minutes.  Stir every 5 minutes after the first 15 and watch carefully so it doesn’t burn.

Cool out of pan.  I cover my counter with parchment paper and spread the mix evenly.  When cool, mix with @3 ounces of dried fruit (I use dried cranberries), and store in air-tight container.  I use a large glass pickle jar.  This makes @30 half cup servings. 

Because I tend to shop at big box grocery stores and purchase in bulk, I always  have most of the ingredients for this readily available in my pantry.  I have not done a price comparison on how this compares to purchasing bags of granola from the grocery store, but I am pretty sure it is much less expensive.  This would be a great home-school math project or even a fun exercise for one of you number geeks out there.  If you decide to do the math, please let me know what your findings revealed.


Summer Goodness “In the Can!”

This was supposed to be a food-production summer! Our intention was to intensely garden and preserve most of the harvest in glass canning jars to enjoy all winter long. Unfortunately, our heavy clay soil, colder than normal temperatures, and the heavy, frequent rains are a poor combination for growing much of anything. Our corn is only waist high and has tasseled out without any ears to pollinate and the green beans drowned out twice.

Fortunately we have a few raised beds with decent drainage and they are producing fairly well. I have a “Ratatouille Garden.” Meaning, most of what I planted in the raised beds will grow into the ingredients of one of my favorite foods, the humble eggplant stew made famous by the Disney movie about a cooking rat!

I don’t make mine in the stylized, stacked strata of the animated film. My version of Ratatouille is scooped, steaming out of the pot, and served with a chunk of crusty, homemade bread on the side.

Everyone who makes this has their own version of the dish, probably because we tend to “make it up as we go along” depending on whatever is ripening in the garden. I make a base of garlic, chopped onions and chopped green or red (or both if I have them) peppers, sautéed until tender in olive oil. Next I add peeled, chopped eggplant and cook that for a bit with the base. I add several cans of Italian Seasoned chopped tomatoes (if I don’t use my own spices and home canned tomatoes or have enough fresh from the garden). Then I throw in chopped zucchini and yellow summer squash. Add Italian seasonings to taste. I don’t measure, and just “eyeball” the quantities, depending on what I have on hand.

I bring it to a boil for @15 minutes to blend the flavors and then ladle into hot canning jars and process in my pressure canner. The veggies are still a little under-done at this stage but will finish cooking in the canner. I set the regulator at 10 pounds of pressure and let it rock for 50 minutes because I preserve this summer goodness in quart jars. Follow the directions for normal pressure canning of low-acid foods. Boil contents 20 minutes before serving.

This is an extremely yummy, low calorie, low weight-watcher point meal before you add the bread! I love Ratatouille and think I could live on this stuff. Thanks to pressure canning, I have captured summer goodness in the can to enjoy all year long!

Bon Appetite!